🤎 Welcome to Grandma’s Homestead! Fresh from the farm to your home — Shop Now →

Starting a Homestead From Scratch (Even on a Tight Budget)

I used to think you needed land, money, and experience to start a homestead. Turns out… I had none of those things. What I did have was a nursing paycheck, a whole lot of trial and error, and a stubborn streak that refused to quit. If you’ve ever felt like homesteading is only for people with big farms, fancy barns, and endless money… you’re not wrong—because that’s exactly how it looks online. But the truth?
You can build a real, working homestead starting with what you already have.
I didn’t start with land handed down.
I didn’t have fancy equipment.
I didn’t know what I was doing.
I figured this out one step at a time—by doing it wrong first, fixing it, and learning what actually works in real life.
In this post, I’m going to show you:
- What you actually need (and what you don’t)
- How to start without going broke
- The exact tools and shortcuts that saved me time and money
No fluff. Just real-life, figured-it-out-the-hard-way kind of advice.
I’ll also link the exact tools and products I use throughout this post, so if you see something you like, you can grab the same setup without all the trial and error.
Affiliate note: This post may contain affiliate links. If you purchase through them, I may earn a small commission at no extra cost to you. Thanks for supporting Grandma’s Homestead!

The Rule That Keeps You From Burning Out
If you try to build chickens, dairy, a garden, bread baking, and food preservation all in the same season, something will suffer.
Usually… it’s you.
What I learned the hard way is this:
You don’t build a homestead all at once.
You build it in layers, one solid system at a time.
- A system feeds itself.
- A system becomes routine.
- A system supports the next layer.
This guide isn’t a massive shopping list.
It’s a roadmap.
Pick one starting point.
Build it well.
When one system feels steady, then you add another.
That’s how you stay within budget.
That’s how you avoid burnout.
And that’s how a small homestead actually grows instead of collapsing under pressure.
So instead of trying to start everything…
Build one system at a time.
Build it well.
Then grow from there.
Now let’s break it down in a way that feels doable.
Below are the basic tools you truly need for each common starting point — nothing fancy, nothing unnecessary.
Choose Your Starting System
You don’t need to do all of these.
Pick the one that fits your life right now.
- 🥕 Start With a Garden
- 🐓 Start With Chickens
- 🐄 Start With Dairy
- 🍞 Start With Bread Baking
- 🧊 Start With Food Preservation
Start with one.
You can always build from there.
🌱 If You’re Overwhelmed and Don’t Know Where to Begin — Start Here
If you’re unsure where to start, I usually recommend beginning with a small garden.
This is the best place to start if you’re overwhelmed and just want something that works.
Not a half-acre. Not 30 varieties. A few raised rows or a manageable in-ground plot.
Why?
Because gardening teaches you:
• Patience
• Planning
• Soil care
• Seasonal timing
• Consistency
Without the pressure of daily animal care.
It’s the gentlest entry point into homesteading.
And it builds confidence fast.
Because when you can grow food successfully, everything else feels possible.
🥕 Start With a Garden
→ If you want the simplest, lowest-cost way to grow real food fast.
• Lower grocery bills
• Seasonal rhythm
• Less daily commitment than animals
Most people quit because they try to do too much too fast.
Start smaller than you think you should.
Bare Minimum Tools:
You do NOT need a full setup to start.
This is the bare minimum I’d use if I had to do it all over again.
• Small cultivator
• Garden rake
• Steel shovel
• Hoe
• Hand trowel
Support Tools:
• Weed fabric
• Propane torch (for clean planting holes)
• Rubber mallet
• Trellis materials
• Hose or watering system
• Quality seeds
You don’t need raised beds.
You don’t need expensive soil blends.
You don’t need a greenhouse.
You need consistency. And these are the simple tools that made that possible for me.
Tools I’d Personally Start With
When I first started gardening, I didn’t have raised beds or fancy setups.
This is what I actually used — and still use. These are the exact simple, durable tools I’d buy again if I were starting from scratch.
Small Cultivator
Perfect for loosening soil between rows and working compost into the top layer without tearing everything up.
Sale

Cordless Tiller for Gardening
9.5In Tilling Width and 6.7In Depth Garden Rototiller Cultivator
$84.99

Buy on Amazon
Basic Garden Rake
For leveling soil and breaking up clumps. Nothing fancy — just sturdy and worth buying once.

Garden Rake
Stainless steel pole will not damage as easily as the wooden handle. Assembly easily, threaded link and very sturdy and not easy to break. The handle of the yard rake is made up of multi-section rod, you could adjustable the length as you need.
$20.99
Buy on Amazon
Steel Shovel
Digging, edging, moving compost. If you only buy one larger tool, make it a good shovel.
Sale

Steel Shovel
Heavy Duty Steel Handle Garden Tools, Small Shovel for Digging Gardening Camping Yardwork
$23.99
Buy on Amazon
Garden Hoe
Simple weed control before things get out of hand. Early use saves hours later. Perfect for digging and planting rows.

Garden Hoe
56-Inch Stainless Steel Handle, Heavy Duty with Non-Slip Silicone Cover
$24.99
Buy on Amazon
Hand Trowels (Small Hand Shovels)
For transplanting seedlings and working in tight spaces. This set is perfect for all the small hand tools you might need.
Sale

All-in-One Gardening Tool Set with Large Storage Tote
A COMPLETE GARDEN TOOL SET – A durable 23 pcs sets is all you need for your gardening.
$24.98
Buy on Amazon
Weed Fabric + Torch for Burning Holes
This changed my life. And instead of cutting holes and fighting frays, I melt clean planting holes and edges. It saves time and reduces weeds dramatically.
Sale

VEVOR 4FTx300FT Premium Heavy Duty Weed Barrier Landscape Fabric (also comes in other sizes)
VEVOR 4 x 300FT woven weed barrier landscape fabric is the preferred choice for superior weed prevention and promotes soil health, keeping your landscaping remain weed-free for an extended period.
$41.90
Buy on Amazon
Sale

Propane Torch Weed Burner Kit
Perfect for burning holes into weed fabric.
Heavy Duty Flamethrower with 10FT Hose for Weeding, Roofing, Melting Snow
$44.99
Buy on Amazon
Rubber Mallet and Staples
Helpful for securing stakes/staples into the weed fabric.
Sale

16oz Durable Rubber Mallet Hammer
This rubber mallet delivers enough force to get the job done while protecting surfaces.
$8.99
Buy on Amazon

240 Pack 6 Inch Landscape Staples
These heavy duty garden staples are made of hard, firm, anti-rust galvanized steel, can be reused many times.
$21.99
Buy on Amazon
A post driver makes installation much easier. You can also usually find this at the farm stores.

VEVOR 14lb Fence Post Driver with Handles
Made from carbon steel, this pile driver is both sturdy and durable. It features a plastic spray coating on the surface to prevent rust and fading.
$32.90
Buy on Amazon
Vertical Growing (Small Space Game-Changer)
Instead of building expensive raised beds or buying decorative trellises, I use cattle panels and T-posts to create arch trellises for vine crops. You can find these at your local farm stores like Tractor Supply.
These are strong, long-lasting, and hold heavy crops like:
• Tomatoes
• Cucumbers
• Squash
• Beans

This lets me grow upward instead of outward — which matters when you don’t have acres to spare.
I buy my cattle panels and T-posts locally at the farm store.
They’re heavy-duty and usually cheaper there than ordering online.
If your garden starts producing consistently and you’re ready to expand into food preservation, that’s when tools like pressure canners, chest freezers, or even a freeze dryer make sense. But don’t start there. Start here.
🐓 Start With Chickens
→ If you want daily eggs and your first real livestock experience.
• Quick food return
• Lower startup cost than larger livestock
• A daily rhythm without full-day commitment
• A gentle introduction to animal care
Chickens are often the first livestock people add — and for good reason.
They teach you responsibility without overwhelming you.
You learn:
• Daily consistency
• Feed management
• Predator awareness
• Basic health observation
• Seasonal adjustments
Chickens will humble you real quick—but they’re also the easiest way to learn livestock.
Unlike a dairy cow, they won’t tie you to the barn twice a day for hours.
They’re manageable.
And when the first egg shows up in the nesting box, something shifts.
You realize this is real.
Bare Minimum:
You do NOT need a full setup to start.
This is the bare minimum I’d use if I had to do it all over again.
• Secure coop – predator-proof matters more than pretty. See option below, check out at your local farm store, or build your own.
• Feeder
• Waterer
• Quality layer feed (see option below or pick up from your local feed store)
• Egg basket and carton storage
That’s it.

Chicken coop with Run
Mobile chicken coop with run

Purina Egg Layer feed
Nutritionally Complete Layer Hen Feed | Omega 3 Formula – 40 Pound (40 lb) Bag
Support Tools:
Shavings or bedding (See option below or buy at your local farm store)
Small storage bin for feed (to keep rodents out)
Basic fencing or run if free-ranging isn’t safe
Simple cleaning rake or shovel


Chicken Poop Scooper
4-in-1 Adjustable Handle for All Tasks: This heavy-duty scooper features a 4-level extendable stainless steel handle
Tools I’d Personally Start With
When I first added chickens, I didn’t buy fancy coops or automated systems.
I bought the basics — and I focused on durability and predator protection.
If I had to start over tomorrow and replace everything, these are the simple, practical items I would buy again.


Triple Nesting Boxes
For Use In Or Out Of Coops
Sale

Egg Basket and Egg Holder
the egg baskets for fresh eggs measure about 8.3 x 5.5 x 6.3 inches in top diameter, bottom diameter and height, and the egg rack for fresh eggs is about 9.4 x 3.8 inches in height and bottom diameter, enough for you to store lots of eggs and save your space
$17.99
Buy on Amazon

2 pack Animal Food Storage Containers
Up to 30 lbs Each, Airtight Seal for Freshness, Wheels for Rolling, Easy One Hand Opening
$29.99
Buy on Amazon

Egg cartons
120 Plastic Clear Egg Carton (each holds up to 12 eggs) made of safe and non-toxic PET plastic, making them reusable and easy to clean.
$28.99
Buy on Amazon
These aren’t flashy.
They’re functional.
And that’s what matters when you’re building a system instead of collecting equipment.
You do not need:
• Automatic coop doors
• Heated water systems (unless you’re in extreme winter and know why you need one)
• Fancy heritage breeds
• 20 birds
Start with a small flock.
Learn their rhythm.
Upgrade later.
When To Add The Next Layer
If egg production becomes steady and manageable, then you can consider expanding into:
• Meat birds
• Turkey
• Incubating chicks
• Selling excess eggs (if local laws allow)
But don’t start there.
Start with a stable laying flock.
Build the system.
Then grow.
🐄 Start With Dairy
→ If your goal is producing your own milk, butter, and cream.
• You want real food independence
• You’re ready for daily responsibility
• You value routine over flexibility
• You’re willing to build discipline first
A dairy animal changes everything.
Not just your grocery bill.
Your schedule.
You don’t “get to it later.”
You don’t skip a day.
You don’t sleep in because you feel tired.
Milk doesn’t wait.
But here’s the part people don’t talk about enough:
If you build the system right, dairy becomes the backbone of your homestead.
It feeds your family.
It feeds your pigs.
It feeds your chickens.
It feeds your garden.
It’s powerful.
But only if you respect the commitment.

What Dairy Teaches You
• Precision
• Cleanliness
• Time management
• Animal observation
• Emotional discipline
Dairy will expose weak systems fast.
Which is why it should never be layered on top of chaos.
Build it when you’re ready to build it well.
Tools I’d Personally Start With
When I brought home my first dairy cow, I thought I needed far more equipment than I actually did.
If I were starting over tomorrow, these are the practical tools I would buy again — nothing fancy, just reliable.
Bare Minimum:
You do NOT need a full setup to start.
This is the bare minimum I’d use if I had to do it all over again.
Stainless steel milk bucket

Stainless Steep Milk Pail
2 gallon
Strip cup (just use a cup with a handle like a coffee mug)
Teat dip and teat dip cup for applying


Clean washable rags or teat wipes

Glass jars for storage

Mason Jars
1/2 gallon (64oz)
Fridge thermometer
Milk filter system (could also use a coffee filter in a funnel but you will find it goes pretty slow and this is much easier)

Milk Filters and Funnel
- Our Large Stainless Steel Strainer has a large filter area for higher volumes of milk- up to 5 gallons
- New Improved Retainer Plug for holding the filter in place! Uses 6.5″ Filters. Find them in our store!
- Fits on the top of our milk cans or any container with a top ID of greater than 5″.
- Comes with one-piece perforated base for coarse straining of jellies, etc- or use with our disposable filters for milk sanitation.
- Choose between the Strainer only or the Combo Package including 100 Filters!
That’s it.
Not a milking machine.
Not a full processing room.
Not a cream separator.
Not specialty cheese molds on day one.
You can hand milk.
You can keep it simple.
And you should.
Support Tools (Once Routine Is Steady)
Extra stainless bucket
Dedicated refrigerator space
Udder balm

Simple log book for tracking

What You Do NOT Need Yet
• Milking machine
• Cream separator
• Pasteurizer
• Cheese cave
• Large-scale dairy processing equipment
Those belong in Phase Two or Three.
Not day one.
When To Add The Next Layer
When your milking routine feels automatic…
When sanitation feels second nature…
When you can handle calving season without chaos…
Then you can explore turning milk into food:
• Butter
• Yogurt
• Cottage Cheese
• Cream Cheese
• Mozzarella
• Ricotta
• Kefir
• Ice Cream
I have step-by-step guides for each in my blog — but they come after the milking system is steady.
Build the foundation first.
Everything else rests on that.
If you’re serious about starting with a dairy cow, I’ve written detailed guides that walk through the practical side of it:
• How to Choose a Milk Cow
• 10 Questions to Ask Before Buying a Dairy Cow
• Feeding a Family Milk Cow
• Milking Once vs Twice a Day
• How to Milk by Hand
• Preparing for Calving
Keeping Milk Safe & Fresh
Once you’re milking, handling milk properly matters just as much as the cow itself.
You can read more about:
• How to Store Raw Milk
• How to Freeze Raw Milk
• How to Transport Raw Milk
• How to Pasteurize Raw Milk
• How to Tell if Raw Milk Has Spoiled
Because a clean system doesn’t stop at the barn door.
🍞 Start With Bread Baking
→ If you want to replace store-bought staples with homemade.
• Lower grocery costs
• More control over ingredients
• A calm, controllable skill
• Something productive you can do year-round
Bread is one of the most underrated entry points into homesteading.
You don’t need land.
You don’t need animals.
You don’t need a barn.
You need flour, time, and repetition.
Bread teaches:
• Patience
• Process
• Temperature awareness
• Timing
• Consistency
And unlike livestock, if you mess up, nothing dies.
You just try again tomorrow.

Bare Minimum:
You do NOT need a full setup to start.
This is the bare minimum I’d use if I had to do it all over again.
Large mixing bowl

Digital kitchen scale

Dutch oven or loaf pan

Dutch Oven
Dutch Oven Designed for Bread Baking: The bread oven is crafted from premium cast iron. Its heavy-duty domed bread cloche perfectly traps steam inside the bread, creating an ideal sealed steam-baking environment. This ensures a golden-brown, crispy crust and a soft, fluffy interior every time, delivering bakery-quality results.
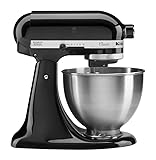
Hand Mixer or Stand Mixer (I prefer KitchenAid but any stand mixer with dough hooks will work)
Sale

Electric Hand Mixer
comes with 2 traditional beaters, 2 dough hooks and 2 whisks
$44.99
Buy on Amazon
Flour
Yeast (or sourdough starter)
Salt
That’s it.
Not specialty grains.
Not a proofing cabinet.
Just the basics.
Support Tools:
Bench scraper

Bench Scraper
5 pcs variety
Clean kitchen towel
Cooling rack
Simple airtight container for flour storage
What You Do NOT Need Yet
• Grain mill
• Specialty proofing baskets
• Fancy scoring tools
Those come later.
Repetition first.
Upgrades second.
When To Add The Next Layer
Once bread becomes routine, you can explore:
• Sourdough
• Fresh-milled flour
• Bulk grain storage
• Selling baked goods (if allowed locally)
But don’t start there.
Start with one dependable loaf.
Build the rhythm.
🧊 Start With Food Preservation
→ If you want to stock your pantry and waste less food.
• You already grow food
• You buy meat in bulk
• You want to reduce waste
• You want long-term food security
Preservation only works well if something is already producing.
It supports another system.
It shouldn’t be the first layer — unless you’re stocking up strategically.
Preservation teaches:
• Planning
• Inventory control
• Batch processing
• Seasonal thinking
It turns abundance into stability.
Bare Minimum:
You do NOT need a full setup to start.
This is the bare minimum I’d use if I had to do it all over again.
Chest freezer
Mason jars

Ball Wide Mouth Quart Jars
12 quart – 32 oz

Ball Wide Mouth Pint Jars
12 pint – 16oz
Basic vacuum sealer

Vacuum Sealer Machine
includes 10 bags
That’s it.
Not a freeze dryer.
Not a full canning kitchen.
Not shelves of equipment you haven’t used yet.
Start small.
Preserve what you already have.
Support Tools:
Jar funnel
Ladle
Permanent marker or label system
Simple inventory notebook

Canning Supply Starter Kit
Jar Lifter, Wide Mouth Funnel, Wrench, Tongs, Lid Lifter, Bubble Popper, Canning Labels, ladle, Measuring Spoon
$15.99
Buy on Amazon


21.5 Quart Water Bath Canner
he sturdy rack securely holds 7 one-quart jars, 9 pint jars, or 12 half-pint jars
What You Do NOT Need Yet
• Freeze dryer
• Pressure canner (unless you already have meat production)
• Large shelving systems
• Bulk Mylar setups
Those belong in Phase Two.
Not Phase One.
When To Add The Next Layer
Once your garden, dairy, or bulk buying becomes consistent, then preservation scales naturally.
That’s when:
• Pressure canning makes sense
• A larger freezer makes sense
• A freeze dryer becomes practical
Preservation supports systems.
It shouldn’t replace building one.
Start Small. Build Well. Grow Steady.
You don’t need acres of infrastructure.
You don’t need a barn full of equipment.
And you definitely don’t need to build everything at once.
You need one solid system.
Built well.
Then another.
That’s how homesteads last.
That’s how budgets survive.
And that’s how you avoid burning yourself out before it even begins.
If you want to see the simple, practical tools I actually use across my garden, kitchen, and barn, you can browse them here:
👉 Visit the Farm Favorites Page
Everything there is something I’ve personally used, replaced, or would buy again if I were starting from scratch.
And if you’d like encouragement, real-life lessons, and practical step-by-step guides as you build your own systems…
Join the Herd below.
I share what’s working, what’s not, and what I’m learning the hard way — so you don’t have to.
Because building a homestead isn’t about doing everything.
It’s about building the right things — in the right order.


